Showing posts with label masking fluid. Show all posts

Tuesday, January 30, 2018

The Nugget Awards

I love teaching because I always come away with little nuggets (= cool stuff I didn't know about) that my students share with me. I taught last weekend, so I came away with a few more! So just like that, I decided to invent the Nugget Awards!

Nugget Award #1 goes to Lori W!

Lori mentioned how much she's loving 2 new watercolor paints she's recently bought.  One is Holbein Peach Black and the other is Daniel Smith's Green Gold.  I use Holbein Leaf Green but I'm going to have to add the Green Gold to my arsenal.  You can see how it can be useful in a less diluted form in the image below.  And Peach Black definitely has possibilities (although I'll never EVER use up all the blacks I already own. I just don't use black very often because it's such a dead color but this one has a little life to it). Do YOU have a favorite black, and do you like to use it straight??


Nugget Award #2?...Lori again!

Lori uses knitting needles to apply masking fluid! The Dollar Store carries them in a variety of sizes for pennies. Priceless! (why keep different sizes?  Because the bigger the needle, or twig in my case, the more masking fluid it holds and the bigger area you can cover).

And Nugget Award #3?  It goes to Claudia H.!

I always keep a value finder handy, especially as my painting nears The End.  Tell me which of these 2 looks you would prefer me to sport from now on!


These are VALUE FINDER GLASSES which are marketed to Quilters because who knew?....it's just as important to have strong values in your quilts as it is in your paintings!

You might also like 

REGISTRATION IS NOW OPEN FOR RETREATS AND WORKSHOPS:
FIND THEM ALL ON MY WEBSITE HERE

SIGN UP FOR MY NEWSLETTER(which is separate from this Blog)
     
PURCHASE ARTWORK       

READ MY LATEST POST HERE.


Friday, February 12, 2016

The mask is gone!!!

The "voice" won out! (You may read yesterday's post HERE)

Here is a pic of where my painting was, as of last evening.


And below is what the painting looks like today, with the masking fluid removed. Dramatically different, no!?  

This is very much STILL  a work-in-progress.
Check back and see what I do next!

It's time to think about Venice in 2017.  Come paint with me! 
Check out my classes HERE.   
Want to be on my mailing list?  Please leave me a Comment...I'd love to hear from you!


Thursday, August 27, 2015

Spray, don't brush (sometimes).

So...I'm working on some watercolor commissions at the moment.  After hitting My Upstairs Studio again this morning, I realized that the bottom left side of my painting was falling a bit flat.  I needed to darken it.  (to give you a frame of reference...the painting is 36"h x 24"w...the section I needed to fix is about 18"h.)  I didn't really want to go in there with a brush and disturb the lovely stuff I'd already laid down.  So, I decided to spray on some color.  Tell me...have you used this technique lately?  It's scary, isn't it!?

Work-in-Progress:  The hydrangeas are still covered with Masking Fluid so that I can freely paint around them.  I wanted the shadow on the path to be a bit more prominent.  I loved the light & shadow in this garden and definitely want to play that up.
This is a close up of that area (before I touched it up).
I covered the right hand side with paper towels...and I actually added a few more torn up pieces (not shown) into the walk itself so I could protect those light areas.
I took a small spray bottle, added different pigments straight from their tubes into the bottle, added a small amount of water, shook it up and tested the spray on a separate piece of paper.  I added some more of another color and sprayed again.  Eureka!  Just what I wanted!  For those of you wondering, I included Ultramarine Blue, a dark purple and some dark green.  I finally also added some Cerulean Blue.  My hope is always that these pigments will granulate once they hit the substrate.
The result.  I'm happy with it.  See how the light shows up so much better.  You cannot have light without darks.
I have much left to do...I"m getting excited to show you all the final piece once it's done!

Come paint with me! 
In 2016, we're going to Venice again.
Sept 2015 classes have been added to my website!
Check them out HERE.

Thursday, April 18, 2013

Tippette #18 - Saving Whites

Tippette = Snippet of a Tip (in watercolor).  One per day...during April...right here!  Tell a friend!


Saving Whites.

There are various ways to have whites appear in your finished watercolor painting.  

1.  The first is referred to as "saved whites".  This is where you physically leave the white of the paper alone, painting around it.

2.  Another way is to use masking fluid.  There are many good brands of masking fluid out there (I rely on Grafix Incredible Masking Fluid).  I recommend NOT using brands that have a tint of color to them... I've found that the pink, green and blue kind sometimes leave a slight stain on the paper when they're removed.  Tippette:  I use twigs (from my backyard) that I've cut down to about a 5-6" length to apply my masking fluid, not brushes.  I find brushes too fat & clumsy  for the finer application of masking fluid (some artists like to use bottles of masking fluid that have a built in syringe for drawing on the painting).  I also find that brushes get ruined very easily.  Instead I cut twigs of various thicknesses and I cut both ends on an angle so it acts like a fountain pen when I use it.  After using it, I set it aside to let it dry and then peel off the mask, making the twig usable again.  You can always cut off a fresh new angle if the end gets a bit spongy from use.


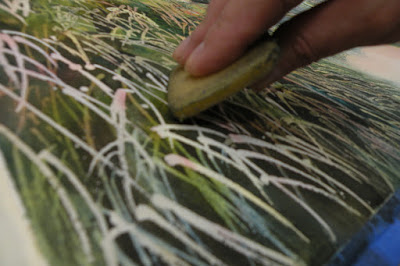
To remove the masking fluid from my paper (always wait till the paper is totally dry), I usually use a rubber cement eraser, although you can also use your thumb if there's not a lot to be removed.  I hold it this angle below.


In case you didn't know this, you can apply masking fluid to the white of the paper (which saves the white) or you can apply it to a subsequent wash of color, which preserves THAT color.  On this close up of a painting below, I used about 5 layers of masking fluid in the grasses themselves.  Some areas stayed almost white, while other areas (in shadow) have color in them. 


Detail of "Lowcountry Magic" by Helen K Beacham - Sold.
In the pampas grass above, I left the fluffy plumes unpainted (meaning I didn't use masking fluid).  Later, I added a touch of color inside the plumes.  But in the grass itself, I used several layers of masking fluid and painted washes of color at each stage.

Tippette:  make sure you apply the masking fluid ONLY to dry paper.  If it's applied to moist or wet paper, it bonds with the paper, making it unremovable.  Never leave your painting in a hot car (like I once did) with masking fluid on it!  You'll NEVER get it off and your painting is ruined (...unless you CROP IT!)

3.  Another way to save your whites is to use a white crayon or white candle wax (off-white won't work unless you want it to show).  I scrape the candle wax gently across the raised tips of my rough paper.  Then, when I paint over it, it keeps that area white.  The wax or the crayon are not removable, unlike masking fluid (unless you use a hot iron to remove it, but then that flattens the roughness of the paper).  You can see examples of what wax looks like in the example below.  Wax was used in the area that looks like a picket fence and in the area above it.  


On the left side, the white vertical marks are where I used a palette knife to scrape into the paint after it had started soaking into the paper somewhat.  When you scrape with the palette knife, the idea is to PUSH the paint out of the way.  If your paint is too wet, it won't work right.  If it's too dry, it won't work right either.  Experiment till you figure out the right wetness to work into.

4.  One more way to keep an area white is to use masking tape (I use blue painters tape).  This is handy if you've got a straight edge you want to preserve.  Again, make sure your paper is dry.  Press down the edges of the tape with the ball of your thumb so that the paint won't flow up under it.  Don't use your fingernail or it could mar the paper.

5.  If you've finished a painting and wish you had kept an area white (but didn't for whatever reason), you can resort to using white opaque paint (either white watercolor, gouache or acrylic).  In my experience, it always looks a bit like a "fix" when you do this, but sometimes we don't have a choice!

Here's my finished painting "Lowcountry Magic" with the pampas grass:
"Lowcountry Magic" (watercolor, 35" x 43") by Helen K Beacham - Sold.
 Come with Helen K. Beacham and Kelly Medford to paint Venice this October...
click HERE for details!


READ MY LATEST POST HERE.


Saturday, April 21, 2012

New Painting (post #5)

Back in the studio today after a day away from it.  Recharged.

In addition to many things that I'm thinking about (as I start my painting day), I think about what I'd like to title this piece.  (sorry for this teaser, but truthfully, I have no clue yet as to what I'm going to call it).

I just added more masking fluid over the first wash in certain areas on the right side and in the upper middle section.  I want to preserve some of those middle values.

Do I always add this much masking fluid?  No.  But this morning I order another bottle of it.  (does that make me an addict???)  I don't know about you, but I hate to run out of something right in the middle of a piece.  I run a well-stocked studio, and my vendors love me for it!

I've added another layer of color to the top left and middle areas.  Trying to show a separation between the masses of shapes. Going a little darker (that means using pretty much the same colors as before, but with less water...kind of like a milky consistency, rather than thin like tea).


I just stood back from my table to get more of a distant view of things, and would you believe I noticed something that I have thought about before, but I rarely think about consciously.  It's this:  after painting all these 30 years, I've definitely got a palette of colors that are "mine".  Look at this photo below...3 different paintings in the works, in 3 different media.  But all three work together because the colors I grab tend to be the same (for the most part).  I know it's a little hard to see, but you'll probably get the idea.


So, now for a picture of where I'm at with the "untitled" painting.  I've added more middle values all over the painting, and I've started adding a few darks so I can start to get excited about what's before me!  Just be sure not to put darks where you don't eventually want them.  Tip:  Keep in mind that your reflections should correspond back to the landscape above them.  So when you paint the landscape, put similar color into the reflections as well.  I've taught a whole workshop just on reflections, and there's always more to study and observe in nature.  (p.s.  I'm getting anxious to rub off that masking fluid....!  It's getting annoying.  But we all know I can't yet.)  There is no color in the plumes of the pampas grass yet.  That's pure white from the paper, plus the yellow of the masking fluid.  They will be the last things I paint.  They even look whiter than the sky (which also has no color yet), but because the plumes appear next to the darks, they look whiter than the sky.


Time to get a glass of tea and let the paint do its thing on the paper.  I may go work in the garden a bit while I'm downstairs...see you later!


Thursday, April 19, 2012

New Painting (post #4)

This morning I restudy my painting in progress (see previous posts below).  Am going to add more masking fluid to the grasses on the left, over my middle value wash.  My plan is to then add the darkest darks to the grass clump and finally remove the masking fluid to reveal the different values of color that I've put down for the blades of grass.

Normally I work across the whole painting, bringing each area up to par with the rest.  In order to show you some quicker results, I've been focusing on the bottom left area, but I'm going to start bouncing around the painting now...especially when it's time to let certain areas dry.  It's raining outside, which means there's more moisture in the air.  It'll take longer to dry.  I don't like to use a hair dryer when I've got masking fluid on my paper.  It could fuse the mask to the paper...never a good thing. (Tip:  but if you wait till the water has soaked into the paper and is no longer shiny, and if you hold the hair dryer high enough, you can get away with using it...just be careful).

Another tip:  I thought I'd mention that I use twigs to apply my masking fluid, not brushes.  Brushes are hard to clean afterward and easily get ruined.  I cut various sized twigs on an angle at both ends and use them like a fountain pen of sorts (I either peel off the dried up mask, or I toss the twig if it's been used more than twice).  The thinner the twig, the thinner the line you can draw.  Tip:  Never shake your bottle of masking fluid.  It might cause bubbles to form which, if not detected, would eventually pop as it dries on your paper, leaving the center susceptible to paint when it's applied in a subsequent wash.  Instead, you want to leave your closed bottle of masking fluid sitting upside down when not in use (which serves to keep the air out so it won't dry out) and then, when you're ready to use it, just turn it over and let it sit again for a minute.  Now it's mixed up enough (if it's been a LONG time since you last used it, you might have to go through these steps 2 or 3 times before it's mixed enough).
Twigs for Masking Fluid Application
I just added a bit of color to an area of the painting and thought it would be beneficial to show you a close up of two areas.  This is to explain that I never go far without changing out my color.  I don't necessarily change the "value" of the color, just the color itself.  To show you that the value remains constant, I've saved the second image as a black and white.  Any time you want to test your values, you can do this, or you can xerox the actual painting in b&w mode.  (Each of these shots represents about a 4" wide area of the painting).  The yellow is still the masking fluid.


Another thing I do from time to time (especially early on) is to draw back into the painting...either I need clarification of what's happening in a certain area (a part of my drawing doesn't seem to make sense), or I just can't see my earlier drawing well enough and am afraid to lose sight of it later on down the road.

I also constantly "babysit" what's happening in various parts of the painting.  My eye roves over it to see if anything needs my attention.  I want a certain amount of "color mixing" to happen on my page, but if color intrudes where I wasn't expecting it (for instance, if the board is bumped or tipped), I can blot up what doesn't need to be there.  But, for the most part, I'm a fan of one area's colors bleeding into the next.  I don't paint within the lines.  Especially within the first wash or two.
-----------
And here's a picture where I've added color to mostly the left side, as well as in the reflections a bit.  The grass blades look garish for now, because of the mask.  It's so tempting to rub it off, but don't!  Now I'm headed to get ready for my friend Susan's art reception tonight.  I won't be able to paint tomorrow, but I'll be back on Saturday with you!  Happy painting!