Showing posts with label Eric Michael’s En Plein Air Pro Easel. Show all posts

Monday, April 29, 2013

Tippette #29 - Plein Air - How to get started

Tippette = Snippet of a Tip (in watercolor).  One per day...during April...right here!  Tell a friend!


Plein Air - How to get started.

Friday, I conducted a 1-day workshop at Four Holes Swamp (Halsey Tract) near Ridgeville, SC (we stopped for lunch at DUKE's BBQ in Ridgeville...well known & loved by locals and visitors). 

Many artists are afraid to paint "en plein air" (outdoors).  I like to expose (pun intended!) more and more artists to that very important aspect of painting.  Many students get spellbound by the beauty in front of them and don't know how to get started...what section should I focus on?  How can I decide what to paint?
One of my students used a homemade viewfinder.
It's made out of foam core and the opening is cut to a proportionate ratio to our 9x12 paper (3:4)
The first thing we do is use our viewfinder (either store bought, or homemade) to scan the scene. We use it both horizontally and vertically to give us many options.  
Using store bought viewfinder..you may draw on it with a dry erase marker.
See details on how to buy one below.
Here I'm using a viewfinder that I bought online (click HERE)...mostly as a demonstration to show how you can easily draw things in perspective.  With this product (which is made of plexiglas AND has a grid on it), you may draw on top of it with a dry erase marker to get the main shapes into position.  Tip: Squint when you look through it so that you don't see a double image!
Fast and easy "dry erase" drawing on my plexi viewfinder, along with a couple of thumbnail sketches.
At this stage, I typically capture the scene with my camera from the angle I'm painting from (if you use your camera or phone to capture the scene, you may also use that as an instant viewfinder, providing you keep the proportions in mind...if your phone screen is not the same size proportionally as your paper, make adjustments accordingly).  If the weather changes and I have to leave the scene, I've got what I need to complete my painting in the studio.  Then I quickly do a few thumbnail sketches to determine what my plan of action will be that day.


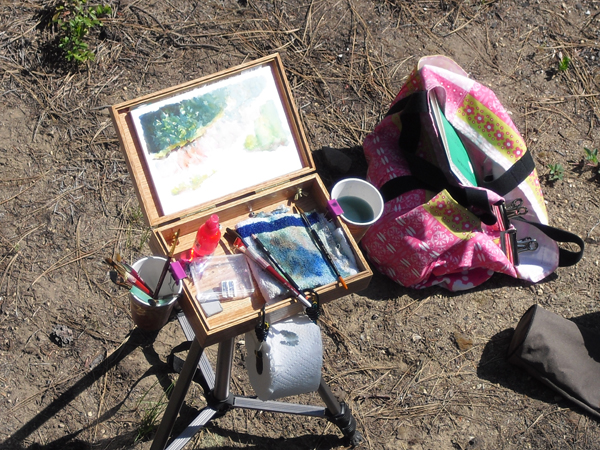
My Eric Michael's EN PLEIN AIR PRO EASEL setup.
I start laying down my washes of color (on Friday, I also sketched into the painting with a pen, after the first layer had dried completely...I don't always use pen and ink, but I do always start with a pencil sketch).  Here, below, is my work-in-progress (about 60% done), along with the research photo.  I'll now do some negative painting to pop out some shapes, and I hope to successfully finish the painting (which I'll show you in a future post).  I'm off to a good start.
Work in Progress (Helen K Beacham)
Reference photo taken at the scene while painting.
     
Come with Helen K. Beacham and Kelly Medford to paint Venice this October...
Two Spots Left!
click HERE for details!

Thursday, April 25, 2013

Tippette #25 - HomeMade Travel Easels

Tippette = Snippet of a Tip (in watercolor).  One per day...during April...right here!  Tell a friend!
HomeMade Travel Easels

Since I'll be taking a group of students to Venice for a plein air workshop in October, we're starting to think about the best (and lightest) products to take with us on the plane.  An important consideration is our easel.  While there are several (ok, not really that many) good watercolor travel easels out there, they can be expensive. Many artists have gotten creative and have made their own.  Here are a couple of ideas that really make sense.


Camera tripod & plastic drip tray
Anne P. says this about her easel:  "I bought a drip tray at the hardware store, drilled a 3/16th's hole in it so the mount would fit through it to attach to the easel.  It was a little wobbly, so I added some foam carpet padding I found in the garage!  The drip tray was big enough to hold an Arches block and a small cup of water."   This setup really makes sense, and for an overseas flight, we might need to come up with an alternative to the plastic drip tray...anyone have thoughts on what could be used?  How about an aluminum baking tray?  Anything else?


Another artist, Jane C., came up with this idea:


Camera tripod & cigar box (or pochade box) - cups clipped on, left & right.
She says: "There are two ways (at least) of attaching the box to a tripod. For my box, which was a little heavy, I ordered a "universal tripod mount kit" from Judson Art Outfitters, the folks who make the Guerrilla pochade boxes. It costs $17.99. Gives the setup a little more stability. However, on a smaller, lighter honest-to-goodness cigar box, I have also used a little piece of hardware called a "t nut", found at hardware stores for about 99 cents. The little bolt on your tripod mount fits into the threads of these pieces of hardware. You drill a hole in the bottom of the box,  pop (from the inside) the t nut into it, and you now have something into which to screw the mounting plate of your tripod. You should just bring that top mounting plate of your tripod with you to the hardware store, to make sure you get the correct diameter of t-nut. They come in different sizes."


One thing I've personally done before is cut a piece of a "rubber gripper pad" (like you put under a rug) to the size of my tray.  It keeps things from rolling around too much in there.

I personally either use:
1) My Eric Michael’s En Plein Air Pro Easel (Cheap Joe’s has it for about $160 although it was $120 when I bought it: www.cheapjoes.com – Part # PROEASEL2).  It comes complete with a palette shelf, water pail, portable watercolor palette, and bags to carry everything in.  Video of the easel setup is here: http://www.youtube.com/watch?v=Qr1rw81ys04.

2) Or, if I'm painting closer to home AND I can throw whatever I want into my car trunk AND I don't have to haul stuff a long way, I like to sit in my folding chair and use a TV tray for my regular sized palette.  You'll see in this picture that I use that blue rolling box in the foreground of the picture to put all things into, and I put down an old blanket or shower curtain or vinyl tablecloth under me if I'm out there barefooted.  It keeps the ants at bay for a little while (or, at least you can see them coming!).


Thanks to my two artist friends for their 2 excellent ideas today!  Do you have others to share with us?  What's worked for you and what things have you learned to avoid?  It's all helpful to us!


Come with Helen K. Beacham and Kelly Medford to paint Venice this October...
Two Spots Left!
click HERE for details!


READ MY LATEST POST HERE.