Saving Whites.
There are various ways to have whites appear in your finished watercolor painting.
1. The first is referred to as "saved whites". This is where you physically leave the white of the paper alone, painting around it.
2. Another way is to use masking fluid. There are many good brands of masking fluid out there (I rely on Grafix Incredible Masking Fluid). I recommend NOT using brands that have a tint of color to them... I've found that the pink, green and blue kind sometimes leave a slight stain on the paper when they're removed. Tippette: I use twigs (from my backyard) that I've cut down to about a 5-6" length to apply my masking fluid, not brushes. I find brushes too fat & clumsy for the finer application of masking fluid (some artists like to use bottles of masking fluid that have a built in syringe for drawing on the painting). I also find that brushes get ruined very easily. Instead I cut twigs of various thicknesses and I cut both ends on an angle so it acts like a fountain pen when I use it. After using it, I set it aside to let it dry and then peel off the mask, making the twig usable again. You can always cut off a fresh new angle if the end gets a bit spongy from use.

To remove the masking fluid from my paper (always wait till the paper is totally dry), I usually use a rubber cement eraser, although you can also use your thumb if there's not a lot to be removed. I hold it this angle below.
.jpg)
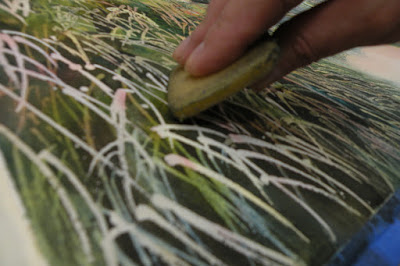
In case you didn't know this, you can apply masking fluid to the white of the paper (which saves the white) or you can apply it to a subsequent wash of color, which preserves THAT color. On this close up of a painting below, I used about 5 layers of masking fluid in the grasses themselves. Some areas stayed almost white, while other areas (in shadow) have color in them.
.jpg) |
| Detail of "Lowcountry Magic" by Helen K Beacham - Sold. |
Tippette: make sure you apply the masking fluid ONLY to dry paper. If it's applied to moist or wet paper, it bonds with the paper, making it unremovable. Never leave your painting in a hot car (like I once did) with masking fluid on it! You'll NEVER get it off and your painting is ruined (...unless you CROP IT!)
3. Another way to save your whites is to use a white crayon or white candle wax (off-white won't work unless you want it to show). I scrape the candle wax gently across the raised tips of my rough paper. Then, when I paint over it, it keeps that area white. The wax or the crayon are not removable, unlike masking fluid (unless you use a hot iron to remove it, but then that flattens the roughness of the paper). You can see examples of what wax looks like in the example below. Wax was used in the area that looks like a picket fence and in the area above it.
.jpg)
On the left side, the white vertical marks are where I used a palette knife to scrape into the paint after it had started soaking into the paper somewhat. When you scrape with the palette knife, the idea is to PUSH the paint out of the way. If your paint is too wet, it won't work right. If it's too dry, it won't work right either. Experiment till you figure out the right wetness to work into.
4. One more way to keep an area white is to use masking tape (I use blue painters tape). This is handy if you've got a straight edge you want to preserve. Again, make sure your paper is dry. Press down the edges of the tape with the ball of your thumb so that the paint won't flow up under it. Don't use your fingernail or it could mar the paper.
5. If you've finished a painting and wish you had kept an area white (but didn't for whatever reason), you can resort to using white opaque paint (either white watercolor, gouache or acrylic). In my experience, it always looks a bit like a "fix" when you do this, but sometimes we don't have a choice!
Here's my finished painting "Lowcountry Magic" with the pampas grass:
.jpg) |
| "Lowcountry Magic" (watercolor, 35" x 43") by Helen K Beacham - Sold. |
Come with Helen K. Beacham and Kelly Medford to paint Venice this October...
click HERE for details!
READ MY LATEST POST HERE.
I'm contemplating a masa paper piece and am coming to the conclusion that I'll need to paint (watercolors) the areas I want to reserve, then put a clear wax over that before I begin squirting (I like to use a small squirt bottle) the background colors into the piece. I discovered that I cannot reserve the whites on masa paper using liquid miskit.
ReplyDeleteAlso, I have found that if I apply miskit on top of color that when I remove the miskit, much of the color comes up too. Maybe it is the brand I'm using. Hmmm...
Love this painting!
Interesting idea about how to approach the masa paper project. I wonder if you can "melt" the clear wax and paint it on? It would be shiny, I think. Masa is "flat" (not rough" so maybe you could get the wax up with a hot iron? Yes, I would think you can't use masking fluid on Masa. And yes, when yo remove the masking fluid, it ever so slightly removes color from the previous layer. But never enough to stop me. Sometimes I just paint a little more into that area to add back some color. p.s. this painting is now in Florida!
Delete